Thursday, December 30, 2010

Fettuccine Noodles Today, Tomorrow....THE WORLD!

I got new toys! I got new toys!
For as long as I can remember I have wanted a Kitchen Aid mixer.  I have even gone as far as trying to swindle my mom into giving me hers (which came from my Opa when they first moved to Canada in the 50's) it was a no go.  But I now have my very own and I call her Wanda.  No, its not weird to name your kitchen appliances, I am sure many people do it...right?
This isn't the only new toy I got though!!!
I also got a pasta maker - and not the attachment to the mixer either.  I have wanted one of those too and now I have both :)
Meet Rosa
Oh, her name?  Rosa (a nice Italian name of course)
Now me being me I had to use them both for 1 meal.  I made my dough in Wanda and rolled it with Rosa.  I like my new friends and they work well together.
Mr. BM, he didn't care too much for Rosa but warmed up to Wanda pretty quickly when she helped to make his apple pie.
The rest of us (Little Ugh, his friend and I) enjoyed a nice heaping bowl of fettuccine bolognese - all from scratch!!

It was a bit of a gong show in the kitchen when I first started the rolling and hanging process - plastic hangers hooked on to kitchen cupboards, flour on the counters, floors, me yelling for more hands.  But once I got the hang of it, smooth sailin and good eats!

I think even if I didn't have a pasta machine I might have tried to make it - can you say adventurous?
Here's how you can make this too:

Egg Pasta Recipe

3-4 eggs (start with 3 then add fourth if not coming together)
2 c. flour
1/2 tsp. salt
1 1/2 tbsp. olive oil

In your stand mixer bowl, add flour and salt.  Stir for 20 seconds.  Add eggs one at a time until combined.  Slowly drizzle in olive oil.  Dough should come together forming a ball.  Turn out onto a floured surface.  Knead the dough for a good 7-10 minutes to work the gluten.  Wrap in plastic wrap and let it rest for at least 30 minutes.

Cut dough into 3 sections.  Lightly flour work surface and dough.  Start your pasta machine on the highest setting.  Run the dough through 3 times on the highest setting, folding in half and dusting with flour each time going through.  Lower the setting one notch at a time and run pasta through only once on each.  For fettuccine the third or fourth setting is the best.  Finally run through the cutters.
Hang your pasta either with a broomstick over 2 chairs or my fav: the plastic hanger hooked on cupboard doors to let dry for about 15 minutes or so.

Lightly salt a pot of boiling water and add the pasta.  Fresh pasta takes much less time than the dry stuff so boil for about 4-5 minutes.
Add to your favorite sauce - We used a bolognese type tonight
I may never have store bought pasta again!!
MMM Finished product
Print Friendly and PDF

Wednesday, December 29, 2010

No Flour Yule Log

So this post comes AFTER the finished product was consumed because, well, its the holiday season and we are all busy!
I keep trying to come up with new things the family hasn't traditionally had for different holidays i.e. Pumpkin Cake for Thanksgiving.  They aren't meant to replace the "norm" unless they are SPECTACULAR, just more of a way to instill the fact that change can be good ;)
This however may remain on our once a year plate because it was pretty darned good!  I am salivating as I type - I really am!

I was watching something (likely the food network) and saw a commercial for the edible yule log or Buche de Noel as it may be referred to and thought "hey, I want to make that!".  I told my MIL that is what I would be contributing this year for dinner - no objections!

The yule log has been around for many centuries and each nation has its own account as to how or why the wood was used. http://en.wikipedia.org/wiki/Yule_log
I am just happy that someone decided that chocolate cake and icing was a good way to keep this tradition alive and ran with it!!  Here's to you, whoever you are *high five*

Buche de Noel

Cake
1/4 c. plus 2 tbsp. granulated white sugar

6 large eggs, separated
1/2 tsp. vanilla extract
6 squares semisweet chocolate, chopped in small pieces & 1 1/2 tbsp. cocoa powder
3/4 tsp. cream of tartar

Whipped Cream Topping
1 c. milk (1%)
1 pkg. instant chocolate pudding mix
3 c. whipped cream

Preheat oven to 350 degrees F and place the oven rack in the center of the oven. Spray a 17 x 12 in. baking pan with cooking spray and line the pan with parchment paper.  Make sure to butter and flour the parchment paper so that the cake comes off smooth.

Separate the eggs, placing the whites in one bowl and the yolks in another. Cover and bring to room temperature - approx. 30 minutes. While you are waiting for your eggs,  melt the chocolate in a bowl placed over a saucepan of simmering water. Remove from heat and cool.
In the bowl with the egg yolks mix 1/4 c. of sugar and beat until light and fluffy (about five minutes- you should notice that when you slowly raise the beaters, the batter will fall back into the bowl in a slow ribbon.)
Beat in the vanilla extract. Add the melted chocolate and cocoa and beat only to combine.
In the other egg white bowl, beat the egg whites until foamy. Add the cream of tartar and beat at medium-high speed until soft peaks form. Gradually beat in the remaining 2 tablespoons sugar until stiff peaks form.

Gently fold a small amount of the egg whites into the egg yolk mixture using a rubber spatula or whisk. Fold in the remaining whites just until incorporated. Don't over mix or the batter will deflate.

Spread the batter evenly into the pan. Bake until the cake is slightly puffy, has lost its shine, and springs back when gently pressed, approx. 15 minutes. Remove the pan from the oven and place on wire rack to cool. Cover the cake with a clean, slightly damp towel.

While the cake is cooling make your frosting :)
Whisk pudding mix with milk for about 2 minutes until it is slightly thick.  Fold in the whipped cream.
The cake is the hardest part!!

Spread 1/3 of the frosting on the cake, roll into a log from the longest side.  The cake may crack, its alright, keep going - it will be hidden by the rest of the frosting.
Cut off a few inches at the end on a diagonal on both sides and place one on top of the cake and one on the side to make it look as though the branches of the log were cut.
Use the remainder of the frosting to cover the rest of the cake.
I made meringue mushrooms for garnish (will post separately)


Print Friendly and PDF

Monday, December 20, 2010

Whimsical Snowflake Cake

Tis the season for snowfall in Canada. YAY!!
What do you do when you want snow but you don't have any?  Take a drive to the local ski hill?  Make paper cutouts to string along frosty windows?  Check out photos of places on the internet?
How about making this tasty cake?  Its sure to please the palate and get you into the wintery mood.
A big ole slice with a nice hot cup of cocoa mmmmmm

Since no two snowflakes are alike you can freehand your flakes and get rip roaring creative OR you could download templates (cheaters) and use parchment paper to transpose them.
This cake is also great for getting your kids into baking with you.  Have them create the snowflakes that will decorate the entire surface.
Little Ugh LOVES to bake with me so it was a no brainer to know that he'd want to help out on this one too.  I can only dream that he is going to want to bake with me for a few more years - not likely *sigh*


1 pkg. Duncan Hines yellow cake mix
2 pkgs. instant vanilla pudding
1 c. milk
3 c. whipped topping
1/4 c. icing sugar
1/4 c. blueberry jam (or strawberry or any fruit really)
6 squares white chocolate
handful of silver edible balls

Prepare cake mix as per box for 2 8" cakes adding 1 pkg vanilla pudding as well.  Cool on wire racks while preparing your chocolate snowflakes and filling.

Snowflakes:
Melt chocolate in a double boiler until smooth.  Let cool for 5 minutes.
Use a resealable plastic bag, place chocolate in and (if you have cake decorating supplies use a #6 round tip) cut a small hole to pipe the flakes.  Use either a template or freehand snowflakes that measure approximately 3" or so in diameter. Place in the freezer for 10 minutes to set.
This should make approximately 30 snowflakes which is enough to decorate the entire cake.

To make the filling/topping take the second vanilla pudding package in a bowl and mix with icing sugar and milk.  Whisk for 2 minutes.  Fold in whipped topping.

To assemble:
On a cake plate lay first cake down, pour warmed jam and spread along the entire surface.  Take 1/3 c. filling and spread onto the jam.  Place second cake on top.  Ice the rest of the cake with the remainder of the frosting (sides and all).  Take your snowflakes and place them sporadically on the sides of the cake as well as the top.
TADA

adapted from a recipe found on the Kraft website
Print Friendly and PDF

Monday, December 13, 2010

Quinoa Paella of Sorts

Quinoa pronounced "keenwa" is a grain like seed that is super high in protein, and amino acids which makes it a likely staple in many vegan diets not to mention it is gluten free.  (This recipe is NOT meat free - we like our meat)
It looks like a little ball and when cooked it turns translucent and has a slight nutty taste.  The most common preparation is to boil it much like rice.
It is recommended to rinse your quinoa prior to boiling to remove any saponins

This recipe was adapted by a few found on the internet as I had sausage and chicken kickin around and for some strange reason rice is not a favorite in the house either (by guess who!) so jambalaya is out of the question *sulking with my lower lip hung low*.


Quinoa Paella 
serves 5-6 main course plates

3 chorizo sausage links
2 c. cooked chicken breasts chopped
2 c. quinoa
3 c. low sodium chicken stock
1/2 large white onion
3 cloves garlic grated
1 tsp. crushed red chilies
1 small zucchini diced
1 red pepper diced
2-3 tbsp. olive oil
Salt and pepper to taste

Remove chorizo from its casing into a pot and brown in oil until nearly cooked.  Set aside.
In the same pot add onions and garlic to soften.  Add chicken stock and scrape any browned bits and bring to a boil over high heat.
Rinse quinoa in a sieve well.  Add to the pot along with zucchini and peppers, chorizo and crushed chilis.  Stir, cover and turn the heat down to a medium/low for approximately 12-14 minutes.
Afterwards, add chicken and stir again.  Heat for another 5-8 minutes or until the liquid has been absorbed.
I garnished with chopped green onions.
Print Friendly and PDF

Saturday, December 11, 2010

Cinnamon Mascarpone Pancakes

EEP I have no milk!  I always use milk when I make pancakes!  Water? Unheard of!!
But I want pancakes *sighs in despair*
Its 9 am on a Saturday in December, I am not putting on clothes, starting my car, driving to the grocery store JUST for milk.  Water it is - ugh.

I guess when you make that "box" stuff it calls for water and it still tastes alright so I suppose I could use it too - but I don't have to like it.

Mascarpone cheese - most commonly used in tirimisu, adds smoothness and umph to these cakes and I guess it makes me happier to add a little dairy back in as well.
I have never used it before because its crazy expensive.  I tend to reserve cheese money for dinner parties and special meals, not for pancakes, but today it just seemed right.
Liven these up by using a fruit syrup or compote rather than Aunt Jemima.

Cinnamon Mascarpone Pancakes
makes approx. 15 4" circles

1 c. flour
2 tbsp. sugar
2 tsp. baking powder
1/2 tsp. baking soda
1 1/2 tsp. cinnamon

1 c. water
1 egg beaten and left for dead
2 tbsp. mascarpone cheese

In a bowl combine all the dry ingredients, stirring to distribute.  Add water, egg and cheese and whisk well.
The batter will be thicker than usual.
Drop onto buttered griddle or pan by tablespoon, creating rounds with the spoon.  Flip pancakes once the bubbles appear and start to break.
Print Friendly and PDF

Wednesday, December 8, 2010

Sweet Treats and Expanding Waistlines Part 4 - Banana Rum Balls


If you are involved in any 12 step program or are allergic to nuts, this post is not for you - avert your eyes!
I recently visited an Italian bakery to get some freshly made bread (I know, I could make my own, get off my back) and while I was waiting for it to be sliced (I KNOW, I could do that too!) I nonchalantly browsed the sweet, delectable, mouth watering treats and knew I couldn't just leave with bread.
I picked up a gigantic, no colossal rum ball.  I haven't had one of these in YEARS. 

I want to say my Omi used to have them at Christmas time but my memory might be a little fuzzy (must be the sampling)
My soon to be MIL needed some help with her hostess gifts this year as timing hasn't been on her side.  I offered to help her out by making peanut butter balls, some sugar cookies and felt something was missing.  Alcohol perhaps?  Yes, just not in my glass.
Hence the post.
Now you can make this with a bunch of varieties of nuts.  Almonds, walnuts, hazelnuts would be good but I used pecans.  You can also use dark or light rum - I chose BANANA.  Banana goes with chocolate and it also is great with nuts.  I think this might be something you will really enjoy!
Print Friendly and PDF

Tuesday, December 7, 2010

Olive Oil Fusilli with Chicken

Every year a bunch of us ladies head to the good ole US of A to partake in the Black Friday Deals that you Americans are so lucky to have bestowed on you (you really don't know how good you have it!)
And every year it is tradition to stop at Wegmans (a grocery store for the rest of us who don't know) to pick up a cooler full before heading back home.
They have such different selections of meats and cheeses that us Canadians can only get at specialty grocery stores or specific delis after googling, search and usually striking out.  I probably spend just as much time in that store than I do at Macy's!!
This year I picked up a bunch of different cheeses (because its cheaper).  They have been sitting in my fridge for a week now and today I finally decided what to do with at least the Asiago I bought.

Generally pasta in our house (as mentioned) is a rarity.  I came across a recipe from Giada on the Food Network today and thought it would be great to try it out.  Mr. BM called and I told him what we were having and to my surprise he said, ok, save me the chicken carcass just in case.  HA! I love him.
I decided that I was going to swing by our grocery store and pick up a ready made chicken to add a little extra depth to this dish.  I was pleasantly surprised when Mr. BM asked if there was leftovers he could bring to work for lunch tomorrow.  That my friends is a sure fire way to know that this recipe is a good one :)

Olive Oil Fusilli with Chicken

3 c. fusilli pasta - cooked to al dente
1/2 pre cooked chicken cut into pieces - I used breast only
1/4 c. olive oil
3 cloves garlic chopped
1 lb baby spinach
8-10 grape tomatoes halved
1/2 c. fresh Asiago cheese shredded
1/4 c. fresh Parmesan cheese shredded

Cook pasta to al dente approx. 8 minutes in lightly salted water.  Drain reserving 1/2 c. water.
Meanwhile in a pan heat oil and saute the garlic for only about 2 minutes.  Add in the spinach and stir for another 2-3 minutes to wilt.  Add the tomatoes and continue to cook.
Drain pasta and add to the pan along with 1/2 c. cooking water.  Stir to incorporate and then add chicken and both cheeses.
Serve and enjoy!
Print Friendly and PDF

Sweet Treats and Expanding Waistlines Part 3 - Peanut Butter Balls

I had a friend, Lisa, whom I met on the first day of kindergarten.  We were best friends from the moment we met until the day she passed away.  Lisa was born with Cystic Fibrosis, a terminal condition affecting her lungs.  This post is for her and all of the memories we shared.

I fondly remember her sharing her grandmothers peanut butter balls with me every Christmas.  She would receive only 1 box each year overflowing with those yummy pieces. She would sneak them into her room when I was over and we would stuff as many as we could in our mouths until her mom would come down and confiscate them.  Little did she know that we also took some out just in case she found out what we were doing so we could eat some later too ;)
She never thought twice about sharing those with me even as a hot commodity and so in the spirit of sharing I would like to share the recipe with you.
It makes me feel good even now as I shove six one in my mouth and think of her :)
I miss you dear friend! XO

Grandma Harris' Peanut Butter Balls
makes about 24-30 balls

1 c. smooth peanut butter
1/4 c. butter (or margarine)
1 1/3 c. icing sugar
1 1/2 c. rice krispie cereal
1 package milk chocolate chips

Cream together peanut butter and butter until combined and smooth. Add icing sugar and stir until combined.  The dough will be a bit tight.  Add the rice krispies and stir until all combined.
Take about a tablespoon full and roll into a ball between your hands.  Place on a baking sheet lined with parchment.  Continue until all balls have been rolled.  Place in the refrigerator (or outside because its cold enough now) and cool for about 30 minutes.
In a bowl add chocolate chips.  Place the bowl over a pot of lightly boiling water to melt making sure no steam enters the bowl or else your chocolate will seize.
Roll the balls in the chocolate and place on parchment once again.  Chill to set chocolate.
These can be frozen.
Makes for a great gift - I wouldn't mind if a package of these showed up on my doorstep!
Print Friendly and PDF

Friday, December 3, 2010

Expanding Waistlines Part 2 - Cheddar n Bacon Perogies

Who doesn't love mashed potatoes?  Cheese?  BACON?!
This gal hearts all of those things. 
To me, a big pile o' smashed taters smothered in butter is sweet heaven. 
Cheese on/in anything, YUM - especially french fries with gravy (called poutine for you non Canadian readers) is melt in your mouth goodness and then there's BACON!!  The other day I was tempted to just fry up a pound of that salty pork belly and eat it as my main course with a side of it just for kicks.  I didn't though, my guilt and my arteries yelled at me so I gave in (but I wanted to, make no mistake!)

All of these things go into the "comfort food" category for me so what better way to enjoy each of those things but to put them together in a soft dough?

I can honestly say this was the first time I have made them.  I am a guilty shopper of the frozen specimen *shocker* but since I am a big believer in purchasing fresh products I figured its about time I learned how to make them, you know, for health reasons!
I am not going to post pictures of the first 10 - 15 I created because you will all laugh, however please note that IF yours don't turn out as you begin, never fear, they do get better as you go along.

Try it, but be warned they do take some time to prepare and only minutes to eat them all.

Cheddar n Bacon Perogies

Filling
4 Yukon gold potatoes
1/3 c. butter
pinch of nutmeg
salt & pepper to taste
1 c. shredded cheddar
4-5 slices bacon cooked to crisp and chopped

Boil potatoes to fork tender and mash using a hand masher with butter, nutmeg, salt and pepper - you don't want them to be whipped.
Let cool.
Meanwhile, fry bacon (I chop them into pieces first and fry) and shred cheese.
Once the potatoes are cool to touch mix cheese and bacon in.  Set aside - the dough takes about an hour to rest.

Dough (enough for 4-5 people)
2 1/2 c. flour
1 tsp. salt
2 eggs
1/2 c. milk
1/2 c. water

Mix together all ingredients in a bowl with a wooden spoon.  The dough will be sticky.  Cover and let rest for 1 hour.
On a floured surface roll out 1/4 of the dough at a time, adding flour as you go along to decrease the stickiness.  Roll to about 8" x 10" and using a glass (or round cutter) cut circles.  Repeat with the rest of the dough.
Once your filling is complete, place 1 tsp. in the middle.  Flour your hands and fold the dough over and pinch starting from the top and work to the sides.
You can place them on a floured cookie sheet and freeze (then bag) for a later use or boil in a pot of lightly salted water until they float (then fry in bacon fat and onions!!)

Have fun!
Print Friendly and PDF

Wednesday, December 1, 2010

Sweet Treats and Expanding Waistlines Part 1 of ...who knows

You walk the mall and you hear holiday music, you see the decorations, Santa's knee is getting sore from all those children climbing all over, but nothing beats shopping with a candy cane white hot chocolate with loads of whipped cream paired with a cinnamon bun to boot.
Just typing that I think I gained 3 lbs!!
This time of year happens to be my favorite.  Not only for the sweets but also for the comfort foods.
I know that when I want to make something sweet I can usually find some people to eat it with me and not feel guilty - because its expected that you put on weight in the holiday season - that's why they have multiple holes on belts people!

Belt notch 1 (compliments of Longo's and The Jo!)

Shortbread Toffee Bites

20-25 shortbread cookies
1 c. salted butter
3/4 c. packed brown sugar
1 tsp. vanilla
1 c. finely chopped chocolate - I used milk chocolate
1/4 - 1/2 c. Skor toffee bits

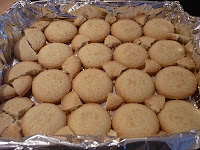
Line 9 x 9-inch baking pan with foil and place shortbread cookies into single layer, breaking last few to fit short end; set aside.
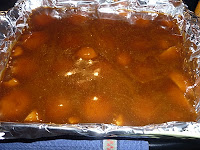
In a pot, bring butter and sugar to boil, stirring over medium heat and boil for 2 minutes. Stir in the vanilla.
Present from my Future MIL - Mexican Vanilla

Pour mixture evenly over shortbread, spreading as necessary. Bake at 350 for about 15 minutes or until bubbly.

Remove from oven and let cool for 2 minutes or until bubbles subside.

Sprinkle chocolate all over and let stand for 5 minutes to melt.  Spread chocolate evenly over top using a small spatula.  Place Skor bits over the chocolate covering all areas and let cool to room temperature. Refrigerate for about 1 hour or until chocolate and caramel are set.


Remove from foil and cut into squares to serve.


Longo's Tip - You can store in an airtight container in the fridge for up to 3 weeks, or freeze for up to 2 months.  Its been a day, I can't imagine I need 2 months of freezer space.
Print Friendly and PDF